Flash ESP32
Multiple USB-Ports
Your board may be equipped with multiple USB ports. This is mostly the case for ESP32-S3 boards. One of the port connects to a USB-UART bridge on the board, while the other connects to the ESP32 natively using USB. The former port may be labeled "UART" or "COM" and the latter port may be labeled "USB". On some boards the labels are on the backside of the PCB.
If you are still unsure which port is which, connect one after the other to your PC and observe whether one of it lists as "CP2102", "CH340", "CH341", "CH342", "CH343" or "CH9102". All of those are USB-UART bridges. The USB native port will list as "(Espressif) USB JTAG/serial debug unit" or similar.
Native Connection
Prefer connecting the board using the native USB connection to your PC. It is often faster to program using the native port and it should work reliably to restart the ESP32 into bootloader mode.
Bootloader Mode
Before starting the flash process you may have to manually put the ESP into bootloader mode. Most boards can be restarted into bootloader mode by the flash utility automatically, but sometimes that is not working.
- Press and hold the
BOOTbutton on your board. This effectively connects the ESP32'sGPIO0withGND. If your board has noBOOTbutton, connectGPIO0toGNDusing a wire. - Reset the ESP32 while holding the
BOOTbutton.- Preferably, use your board's
RESET(sometimesRST) button to perform the reset. Press it once. - Alternatively, perform a power-on reset: Disconnect the power supply and make sure that the board is not powered from any other source. Reconnect the power supply, possibly by plugging in the USB cable.
- Preferably, use your board's
- Release the
BOOTbutton.
Write to Flash Memory
The actual procedure to flash the ESP32 depends on the tool used. Click on the tab below that matches your flash tool.
The easiest, platform independent method. Requires Chrome based browser.
Espressif Web Flasher
Platform-independent method. Requires Chrome or Edge browser. Allows to
install arbitrary firmware binaries. Flash factory binaries to address
0x0 and non-factory binaries to address 0x10000.
Espressif provides their own Flash Download Tools for Windows.
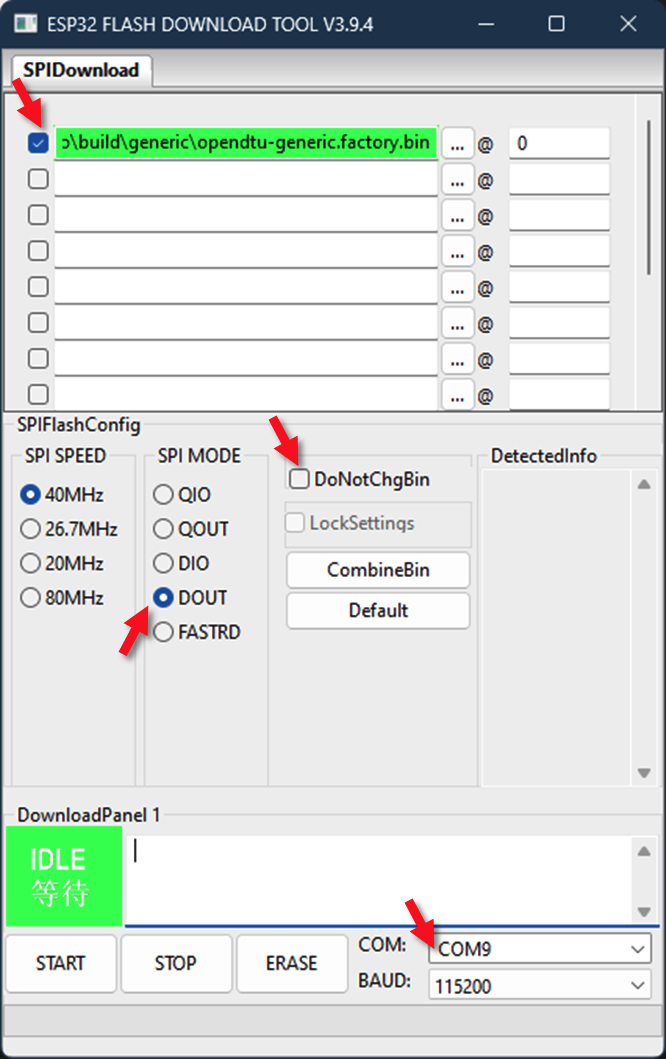
Change COM9 to the correct port on your computer.
- On startup, select Chip Type --> ESP32 and WorkMode -> Develop
- Prepare all settings (see picture). Make sure to uncheck the DoNotChgBin option. Otherwise you may get errors like "invalid header".
- Only if you want or need to start from scratch (settings are lost): Press "Erase" button on screen. Look into the terminal window, you should see dots appear. On some boards, the automatic bootloader selection does not work. In this case you have to manually press the "Boot" button on the ESP32 board. Wait for "FINISH" to see if flashing/erasing is done.
- To program, press "Start" on screen, then the "Boot" button (if required).
- When flashing is complete (FINISH appears) then press the Reset button on the ESP32 board (or powercycle ) to start the OpenDTU application.
Install esptool using pip:
python3 -m venv /path/to/your/venv
source /path/to/your/venv/bin/activate # on Linux
/path/to/your/venv/bin/Activate.ps1 # on Windows
pip install esptool
esptool version # should show esptool version
Use esptool to write a firmware binary to your ESP32:
# erase flash only if you want or need to
# start from scratch (settings are lost):
esptool --port COM1 erase_flash

esptool --baud 921600 --port COM1 --chip esp32 \
    --before default-reset --after hard-reset \
    write-flash --flash-mode dout \
    --flash-freq 40m --flash-size detect \
    0x0 opendtu-generic*.factory.bin
- Adjust the
--chipparameter to the actual chip in use, e.g.,esp32-s3. - Change
COM1to the correct port on your computer.1 - In case you get an error at the end of the flash procedure, you can try again using a lower baudrate eg. 460800.
Users report that ESP_Flasher is suitable for flashing OpenDTU on Windows.
-
Linux only: A quick way to find ot the correct port name is to use the command
ls -l /dev/tty*and pick the last name in the list, e.g./dev/ttyUSB0. If you encounter the errorInvalid value for '--port' / '-p': Path '/dev/ttyUSB0' is not readable., the commandsudo chmod a+rw /dev/ttyUSB0temporarily grants the required permissions. ↩